
From Photo to Painting with the Smudge Brush
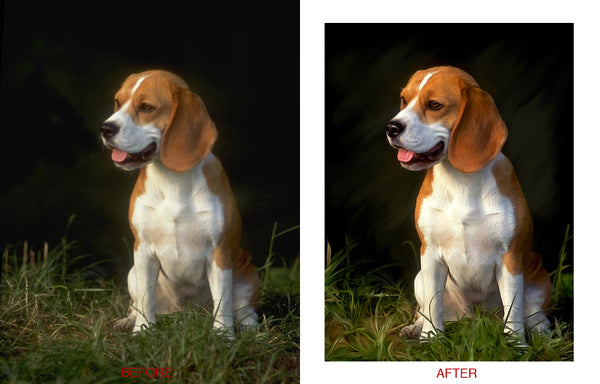
Photoshop artist Scott Deardorff, profiled in a recent article, has been kind enough to allow us reproduce his beagle painting tutorial. This tutorial details Scott’s method for creating a digital painting using the Smudge brush in Photoshop (thanks, Scott!). So without further ado, let’s get started.
Introduction
The best way to learn to smudge is to practice – to get used to how the brushes work at different sizes and strengths. The smudge tool is really an amazing tool. It can be used to blur, distort, erase, sharpen, paint, and add or subtract texture among other things. Try playing around with its different settings just to get a feel for it (use the original copy of this beagle, which is available for unrestricted use). Play with the different mode settings: normal, lighten and darken. Experiment with different brush sizes and strengths. For “Beagle” I used only one brush (the rough round bristle brush, which can be found in the “thick heavy brushes” in PS CS). But I used it at many different size and strength settings to achieve whatever result I was looking for. Also I used this brush about 95% in the normal mode setting (In this tutorial all modes are normal unless indicated otherwise).
Step One: Image Corrections
Right-click on the Beagle original photo, and save to your hard drive, to follow along.
Start out by doing some basic image corrections: crop the image as desired, perform a curves adjustment to increase contrast and a saturation increase (hue/sat targeting red) to enhance the color. Your corrections should produce something similar to this:

Upsize the image to approximately 16 x 22 at 72 ppi. This will give you enough size to work with. Sharpen the image by whatever means you prefer. Sharpen substantially, so it looks over-sharpened. Your image should now look something like this:

Start smudging
Now you can begin the task of smudging the image. View the image at 200% as you smudge, which will permit greater attention to detail. For all the fur areas use a 15 px. brush at a strength of 40%. IT WILL BE KEY TO MAKE YOUR SMUDGE STROKES FOLLOW THE DIRECTION OF THE FUR. Your fur texture won’t show much detail yet. A later step will help to bring out some definition. You will have to use a smaller brush (about 10 px.) still at a strength of 40% to smudge in tighter areas, like the mouth, nose and around the eyes. Remember to follow the natural lines of whatever it is you are smudging, as your strokes will become more apparent later. At the end of this step, your beagle should look like this:

Enhance the eyes, nose, and mouth
In this step we’ll give him a little more life by enhancing his eyes nose and mouth. Use the same 10 px. brush at 40% to smudge the irises (the colored part of the eye) and any parts of the eyes that haven’t been smudged. Set the smudge tool to darken and use a 5px. brush at 100% to remove the existing catch-lights. Use the burn tool (about 5 px., exp. 6% – set to shadows) to burn in the pupils, the circumference of the irises and the outlines of the eyes. You may need to smooth these areas out a little with the smudge brush. Use the burn tool (about 15 px./3%/shadows) to darken the black areas of the nose and mouth. Use a 1 px. hard brush to paint white catch-lights into both eyes. Use the dodge tool at a low exposure to add a little extra light to the irises opposite the catch-lights. Also use the dodge tool to add highlights to the tongue and brighten the highlights of the nose. It looks like this now:

Work the background
Usually the background is done first in a smudge painting. For this tutorial, we’ll do it at this stage. First, erase the whiskers (they’ll be painted back in later) using your smudge brush (darken/10 px/100%). Take a snapshot and designate this as the history brush state. Now use the smudge tool (lighten/60 px./60%) to smudge some brushstrokes into the background. Move the brush from the background, toward and overlapping the beagle. Once the background looks good you can use the history brush to go back over the subject removing the smudge strokes. You’ll need to clean up the edges with a smudge brush set at normal/10 px./75%. Here’s what that looks like:

Apply the Photoshop Paint Daubs filter
This next step will enhance textures substantially. On a duplicate layer apply the paint daubs filter (brush size 1/sharpness 4). Use a layer mask to remove or lessen the sharpening in certain areas that appear over sharp. Flatten. This is how the image should look at this point:

Painting back the whiskers
Now smudge in the whiskers (normal/3 px./100%). For the long eyebrows take a color sample of a fur highlight area and check the finger painting box. It looks like this now:

Correct green color cast
Remove the green color cast under his nose and jaw line by selecting and feathering that area then making a color-balance adjustment (add a little more red). Here’s that correction:
Finishing up
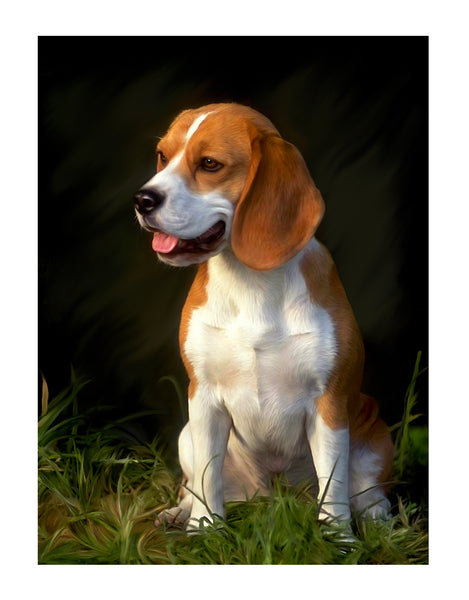
For the grass (not shown in the detail) use a grass-blade-sized brush at about 85% to smudge the individual blades. Set the mode to darken for blades directly in front of white fur. Here’s the finished image:
Thanks again to Scott Deardorff for allowing us to reproduce his tutorial here. You can see more of Scott’s work at his gallery. Scott has a new website and some training DVDs in the works. We’ll keep you posted!

