
Tutorial: Basic Portrait Painting Technique for Corel Painter
Originally Published July 2008
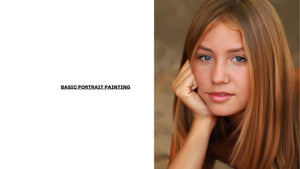
So, you want to learn Painter, but you don’t know where to start. The journey of a thousand miles begins with a single step, a wise man once said (it wasn’t me). Don’t let those hundreds of brushes and the bewildering array of menus intimidate you. Today, we’re going to start with a subject that usually causes beginners lots of grief: a pretty girl. Why is a this a tough subject? Because of the smooth skin and shiny hair. Beginners find it hard to paint skin without it turning into a mess of hard-edged strokes. And hair can send newbies screaming from the room. Take heart, my brave ones, for today we will learn how to paint skin and hair. And along the way, you’ll start to find your way around the Painter interface. One step at a time.

First, let’s download a good sample photo to work on. The Stock.Xchng website (www.sxc.hu) is a good place to find free stock photos for practicing your Painter skills.
I have done some basic retouching (cropping and retouching, removing fly-away hair and blemishes) using Photoshop. I always do basic retouching in Photoshop before going into Painter. I’ll be covering that process in a future article.
Fundamental techniques for painting a portrait
Before we start, let me just say that this is not the only way to paint a portrait with Corel Painter. Far from it! But our goal here is to learn how to get great results using Painter, and this is an easy way to do that. As you develop your skills and confidence, you may want to take these methods much further, into the realm of Impressionism, where the brush strokes are more obvious. The technique I show here would work well for a portrait photographer looking to add a painterly finish to their high-end portraits.
Select your brush and adjust the settings
In the upper right of your screen, look for the brush selector bar. Click on the drop down (a tiny triangle) next to the brush icon. A list of brush categories will appear. Look for Acrylics. Now click on the tiny triangle next to the “dab” icon (which is next to the brush icon). Select the very first brush type (called a “variant”), Captured Bristle. Your brush selector bar should look like this now:

Brush selector with Acrylic Captured Bristle selected
Captured Bristle is probably the most popular brush in Painter, and you’ll find it’s a good all-around brush for lots of areas. Let’s adjust the brush settings. In the upper left, look for the Property bar. It looks like this:

To begin, change the brush settings as follows: Size 30, Opacity 75, Grain 10, Resat 30. Don’t worry about what these settings mean for now.
Using the Clone Color function
By cloning the image, you have created an almost magical link between the original and clone images. When you click on the Clone Color button (it looks like Photoshop’s “rubber stamp” icon), Painter will magically “load” your paint brush with color as you paint, pulling color from the original onto the clone. You can tell when the Clone Color function is active: the Color wheel will look “greyed out.”

Make sure that the Clone source file is the original image: go to File > Clone Source. There should be a checkmark next to the file you cloned. If not, just click on it.
Step One – Paint the background

Step Two – Paint the skin

Now it’s time to paint the face, arm, and hand. First, zoom out far enough to see entire face. Stay with the Acrylics Captured Bristle brush, but use these settings: Size 16, Opacity 30%, Resat 20%. Paint using short, circular “c” strokes; don’t use much pressure. Don’t scrub back and forth; stroke gently. Once the major face areas are done, reduce the brush down to size 8, to do areas around eyes and nose. Don’t try to cover large areas with a small brush, or you’ll end up with splotchy patches. Paint only skin in this step – no lips or eyes yet. Don’t overwork it, but do take your time.

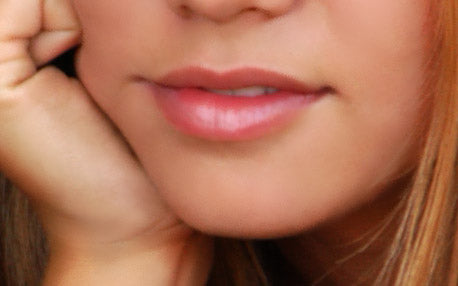
Step Three – Paint the lips
Step Four – Paint the hair using the Flat Oils brush


To paint the hair, begin by zooming out so you can see the whole image on your monitor. (Choose Window > Zoom to fit) Use a fairly large brush size for the Flat Oils brush: Size 35, Opacity 40, Resat 5, Bleed 0, Feature 4.6. (Setting the Resat to such a low value is the key, by the way, since it allows the brush to “drag” the colors on your image, rather than reproduce them exactly as they are on the original.) Reduce the brush size to paint the edges, and to get into the folds in the hair.
You’ve done it!
If you’ve followed along this far, congratulations! You’ve completed the basic steps of a Painter portrait. In Part Two, we’ll learn how to paint the eyes. I hope this short lesson gave you some insight into how the cloning process works in Painter. Please share your experiences with this tutorial down in the comments area. Also, if you have suggestions or questions, fire away. There are more tutorials on the way!

