

Review: Topaz InFocus
Originally Published December 2009
The other day, a friend needed to have a family photo cleaned up for use on a Christmas card. The photo was taken with a cheap point-and-shoot camera, and the detail just wasn’t there. So I opened it up in Photoshop CS5, and did the usual stuff with Unsharp Mask. The results were okay, but still not very satisfactory. Then I remembered that Topaz Labs had just released a new product called InFocus, which was supposedly able to find and recover lost details in out-of-focus shots. This seemed like a good time to give it a try.
Topaz allows a 30 day trial on all their software. You get to try out the full product, save files, the whole nine yards, so you can really see how it works. I downloaded the program, installed it, and the first time I ran it, it required that I get a key from Topaz. I got one quickly via email, and was ready to start performing magic. I say magic, because the examples shown on the Topaz site look frankly unbelievable. You look at the before and after and think, no way. They blurred a sharp picture and called it Before. No way it can find that much detail in a blurry photo. Well, I can’t say I got such dramatic results, but without reading the directions or watching the nice tutorial video Topaz provides, I got the following results.

The original photo is on the left, blown up a bit to show what we’re dealing with. I enlarged this original about 100%, and then did my best with Photoshop’s Unsharp Mask. The middle image shows what I came up with. Then, I went back to the original, blew it up 100% again, and ran Topaz InFocus. As you can see, it blew USM out of the water. When you look at the original and compare it to what InFocus did, it does seem like magic. This is one spooky piece of software. Afterwards, I reduced the file back down to the original 4×6″ print size, and it looked very good. My friend was thrilled.

I ran some informal tests to see if I could get a result as dramatic as Topaz shows on their site. Unfortunately, I couldn’t but then I don’t know the tool as well as they do. If you do decide to give InFocus a try, look for and watch the tutorial videos on the Topaz site. You’ll see how the sliders are meant to be used. You’ll also learn how different InFocus is from sharpening filters. Sharpeners tend to look for edges, and make them harder, more defined. InFocus, on the other hand, tries to find all of the details, not just the edges. It’s like a smart sharpener.
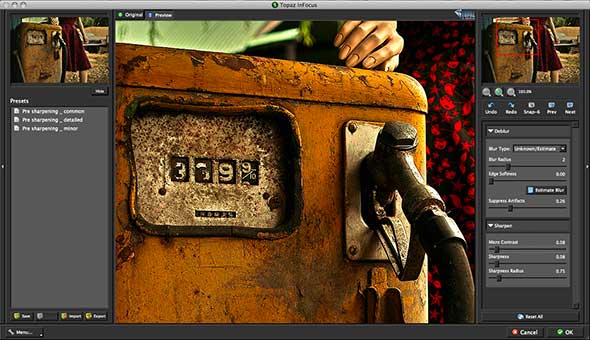
The controls are quite simple. There are two main areas: Deblur and Sharpen. The Deblur function is what I was talking about: finding details within a fuzzy photo. Under Deblur, there are four types of blur: generic, out-of-focus, straight motion (i.e., the camera wasn’t held steady), and Unknown/Estimate. You choose the type which most closely matches the problem you’re trying to solve. The Blur Radius slider is how you indicate to InFocus just how bad the blur type is. The higher the Blur Radius setting, the stronger the deblur effect. If you set it too high, you’ll get artifacts. You can counteract that with the Supress Artifacts slider. This will reduce minor artifacts, but the trade-off is loss of detail. The alternative is to simply lower the Blur Radius amount a tad.
The Estimate Blur button becomes active when you choose Unknown/Estimate as the blur type. First, set the Blur Radius to give InFocus some direction. Then, hit the button. This works best if you’re focused on an area of the photo containing some hard edges. It seems to use edges as a baseline, in determining just how blurry your image is. Once again, you can use the Suppress Artifacts slider if the deblurring is a little too aggressive. Keep in mind that, unlike the other blur types, Unknown/Estimate doesn’t do anything until you hit that button; the other settings work in real time as you slide the sliders.
For motion blur, you can tell InFocus about the angle of movement, using the Motion Angle slider. I didn’t have a good photo to test that with.
The bottom section, Sharpen, is sort of optional, it seems to me. You can get some extra detail with the Micro-Contrast slider. It seems to work a lot like Topaz Adjust, in a more subtle way. Honestly, the results of the Deblur settings seemed to be good enough, and I just bypassed the Sharpen section altogether.
Conclusion
Topaz InFocus is a valuable addition to the suite of tools from Topaz Labs. It won’t rescue a really badly out of focus image, but it does perform wonders with photos that are not as sharp as you’d like. I tried it with some photos that already looked pretty good, and it found missing details anyway. The mind seems to compensate for these subpar images, I guess. And for images that you are hanging onto but never use because they’re just not sharp enough, here’s your answer. It’s like you’ve suddenly found a bunch of great new, sharp pictures, all waiting on your hard drive.
I should mention that InFocus is a 64-bit application, as all of the Topaz products are. It works with all the latest versions of Photoshop and Photoshop Elements, and runs on both Windows and Macintosh. It ran very quickly on my Mac Pro with Snow Leopard installed. $69.95, from Topaz Labs.

