-->

Tutorial: Painting Fairy Portraits with Corel Painter

November 25th, 2008  |  Published in Featured, Tutorials  |  6 Comments

This tutorial shows you how to create a fairy portrait without any props, using Corel Painter. Photography by Capture the Moment, Shelton, CT. Used with permission.

This tutorial shows you how to create a fairy portrait without any props, using Corel Painter. Photography by Capture the Moment, Shelton, CT. Used with permission.

One of the ways my studio, A Work of Art, helps professional photography studios keep their costs down is by providing them with digital backgrounds. Without having to spend a small fortune on props, backdrops, and sets, studios can offer creative fantasy portraits by using the magic of Photoshop and Painter. Today I’d like to show you how the portrait above was done, step by step.

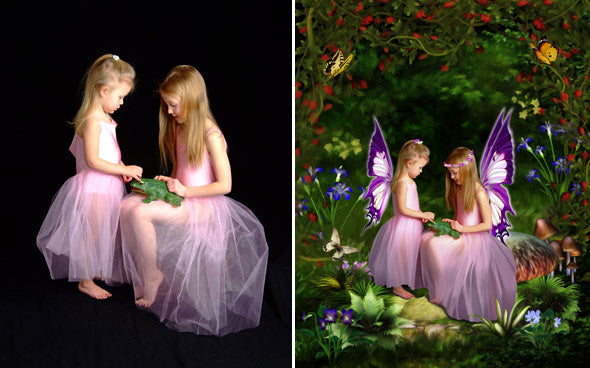
The process began with a phone call from Connecticut master photographer Grace Cribbins. Grace said she’d like to do a fairy portrait, and wanted to know how to shoot for that. I told her to shoot against a plain black or white background, and make sure the subjects were well-lit. The girls could stand or sit, and I’d create the environment to match. As you can see, Grace posed them in ballet dresses, against a black cloth. The only prop they had was a little plastic frog. One challenge was that the younger sister’s outfit was too big for her. I told Grace that I’d be able to fix that easily during the painting process.

Once Grace sent me the photograph to paint, I needed to find a suitable background. For backgrounds, I usually create a scene in Vue Infinite , or search for a good stock photo. But in this case I had found some digital backgrounds for sale on Renderosity, and decided to go with them. In Photoshop, I opened Grace’s photo of the girls and removed them from the background. Then, I composited them with three images from Renderosity, and sent them to Grace to see which one she liked best.

Three rough composites sent to the photographer for approval.

Three rough composites sent to the photographer for approval.

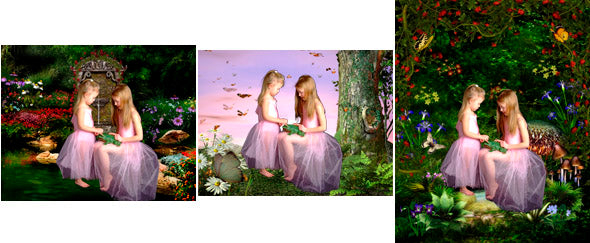
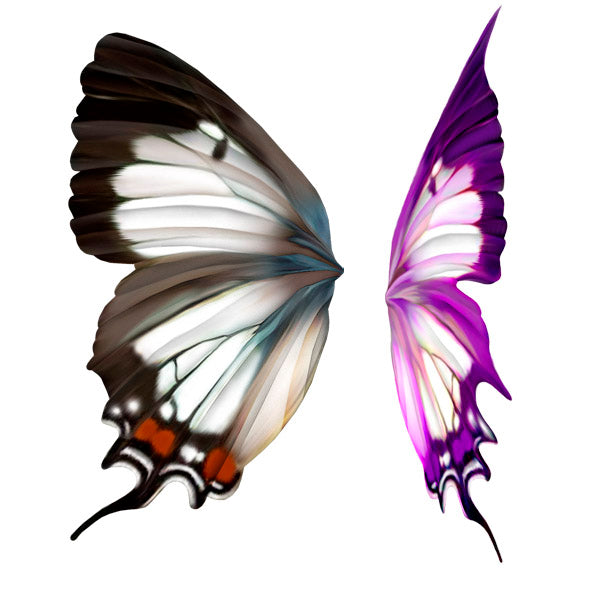
Grace decided to go with the third image. Now I was ready to fix up the composition (add wings, move the mushroom on the right so that the older girl appeared to be sitting on it) and then bring it into Painter. For wings, I only needed to create one wing, and then duplicate it and/or flip it a few times to create two pairs. I took a single butterfly wing (left) and stretched it out using Edit>Transform>Skew. Then, I changed the colors using the Hue/Saturation settings. I chose a violet color to go with the girls’ clothing. One final touch was to add a glow to the wings using a Layer Style.

The original butterfly wing (left) was transformed into the fairy wing on the right.

The original butterfly wing (left) was transformed into the fairy wing on the right.

After getting all the elements in place in Photoshop, I flattened the image and opened it in Corel Painter. I painted the dresses so that they looked less like tulle and more like satin, and also altered the younger girl’s dress to fit better. The final touch was to add a daisy chain crown for the older sister, and a few for the younger girl, too. This was created on a separate layer in Painter, using the Image Hose. I’ll be devoting an article to the Image Hose in an upcoming issue.

A close-up of the final painting. Note the glow around the wings, and daisies added with the Image Hose.

A close-up of the final painting. Note the glow around the wings, and daisies added with the Image Hose.

Related posts:

  1. Tutorial: Painting the Eyes with Corel Painter Part Two of a two-part tutorial about basic portrait painting techniques with Corel Painter....
  2. Tutorial: Basic Portrait Painting Technique for Corel Painter Ready to try Corel Painter? Learn how to achieve smooth skin and silky hair with this tutorial....
  3. Tutorial: From Photo to Painting using Painter’s Quick Clone Here's a simple, easy-to-follow tutorial showing how to use Painter's Quick Clone to turn a photo into a painting, fast!...
  4. Replacing the Background in Your Portraits - Part Two By replacing the background and incorporating a few extra elements, you can create a fantasy portrait. A step-by-step tutorial. ...
  5. Replacing the Background in Your Portraits - Part One See how changing the background changes everything! Part One of a series....
  6. Tutorial: Create a Fantasy Painting with Photoshop and Corel Painter Learn how to assemble a fantasy image using stock images, and then create a painting with Painter....
  7. Tutorial: Quick and Easy Waterdrops with Corel Painter Tutorial: Learn how to create realistic waterdrops quickly and easily with Corel Painter. ...

Stumble it!

Responses

  1. Avril says:

    November 26th, 2008 at 5:37 am (#)

    wow thank you so much for this….will certainly be
    trying it…looking forward to your article on the image hose….
    Thank you!

  2. Bob Nolin says:

    November 29th, 2008 at 2:05 pm (#)

    Thanks for posting, Avril! Glad you found it helpful. The image hose article is on the way.

    Bob

  3. Vickie says:

    December 10th, 2008 at 8:42 am (#)

    This was so very helpful! Thanks so very much for simplifying the process for us beginners! I look forward to seeing more of your tutorials.

  4. Bob Nolin says:

    December 10th, 2008 at 11:19 am (#)

    Thanks, Vickie! I appreciate the support! Glad you found it helpful. If there’s a topic you’d like to see covered, just leave a comment here.

    Bob

  5. Socialite says:

    December 20th, 2008 at 8:47 pm (#)

    Wonderful tutorial. It’s easy to understand and follow. Thank you! Would you have a tutorial on creating a cracked paint look using Corel Painter?

  6. Bob Nolin says:

    December 21st, 2008 at 5:58 pm (#)

    @Socialite

    Thank you for the kind comments! As for “cracked paint,” I don’t know of a good way to use Painter for that. But look into Photoshop’s Craquelure filter, which may do what you want. Go Filter > Texture > Craquelure.

Leave a Response

A Work of Art Studio
Add to Technorati Favorites