

Tutorial: The Making of Viking Chieftain
Originally Published December 2010
Today we’ll start a multi-part series showing how I deal with lighting problems in a portrait, and how I use Topaz Adjust to add drama and impact to my portraits. I’ll also show you some photomanipulation (photo compositing) techniques, and then we’ll bring the composite into Painter, to create the painting shown above. The layer mask technique I’ll show you here is similar to the one in this article, where the goal was to darken one side of the face in a straight-on portrait. In this new tutorial, the technique is one you can use when a photo was taken outdoors in bright sunlight. It can also be used to help reduce the effect of a bright flash photo. I use this technique all the time to adjust lighting. In photomanipulation, it’s very helpful when combining images taken in different lighting situations, to give them consistent lighting.
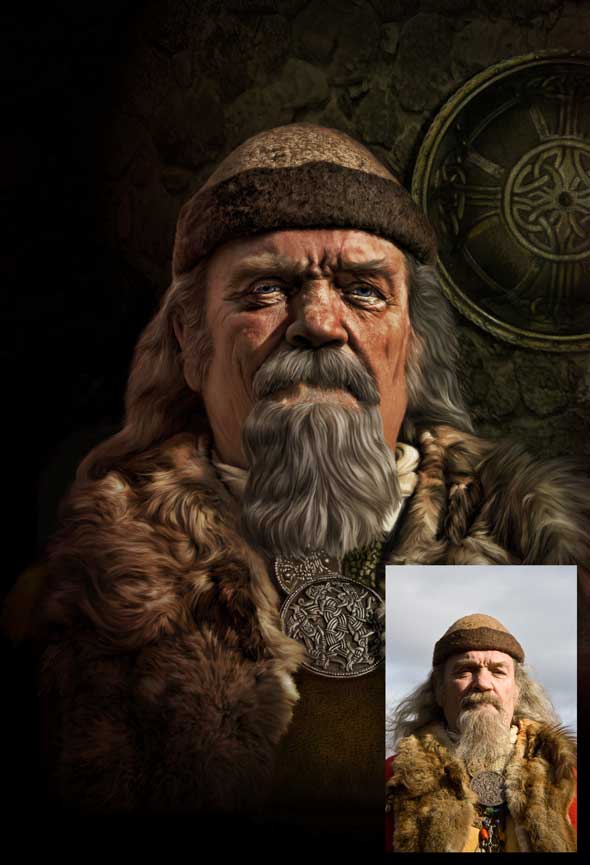
The original photograph being used here comes from a member of the wonderful deviantArt community, Tigg Stock. You can get a copy of the image here, if you’d like to follow along. This photo was taken outdoors, and the subject is too brightly lit on one side, and too dark on the other side. To make matters worse, the subject is squinting. We’re going to correct all three problems in Photoshop. So let’s open it in Photoshop, and make sure the layers palette visible.

Let’s add a new layer, filled with solid black. (Layer > New Fill Layer > Solid Color…, and choose a dark black, click OK.) This covers the whole image with black, but we only want to cover the sky. So click on the layer mask icon in the layer palette. Photoshop creates a layer mask on a Solid Color Fill layer. The icon is a white rectangle. White means we’re not masking anything yet. So click on the icon to activate the layer mask, pick a soft brush, make the foreground color black, and begin painting on the image. That’s right, you paint on the image itself, but what you’re actually doing is painting on the layer mask. It’s a bit weird at first, but watch what happens: as you paint with black, the Viking reappears. If you reveal some of the sky, change the foreground color to white, and paint with white to cover up the sky again with black. Paint over the entire Viking figure with black on the layer mask, until only the sky remains black. Don’t worry too much about the loose strands of hair at this point. We’re going to paint over all of that in Painter, later on. Just create a rough mask so that we can concentrate on the subject.
Darken the Light Side
Now we’re ready to turn down the bright, sunlit side of his face. We’ll use the levels adjustment for this, limiting it the sunlit areas with a layer mask. First, insert a levels adjustment layer (Layers > Adjustment Layer > Levels…). Do not turn on clipping. This creates a layer with a levels adjustment and a layer mask, as before. Click on the layers icon in the layers palette, and adjust the sliders to darken the whole image. Concentrate on the area that is sunlit, and darken until that area seems to be properly lit. This is a subtle change, so don’t overdo it. Obviously, everything else is too dark now, but we’re going to fix that next with a layer mask. And we just happen to have one we can copy, down on the Blacken Sky layer. Holding down the Alt/Option key, click and drag the layer mask on the Blacken Sky layer up to the layer mask on the levels adjustment layer. When you release the mouse button, Photoshop asks “Replace Layer Mask?” Click on Yes. This copies the mask to the new layer for you. This causes all of the level adjustment on the face to go away. We’ll paint with white now, just on the sunlit areas, and it will reveal the adjusted, properly-lit areas. This is what my layer mask looked like when I was done:
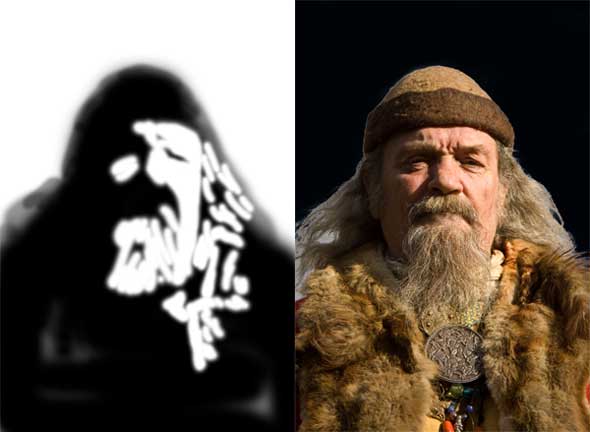
If you’re wondering how I got that screenshot of the layer mask, here’s how: hold down the Alt/Option key and click on the layer mask icon. Suddenly the image mask appears on top of your image. To make it go away, just click again on the layer.
End of Part One
This has been a lesson in using layer masks, which you will find indispensable once you see how they work. They give you ultimate control over each layer’s effects. But that’s as far as we’ll go this week. I don’t want to overwhelm you with too much, and there’s a lot more to come. Let me know if this wasn’t clear, or if you got lost at some point. It’s very hard to write about layer masks. It would be a lot easier to show you with a video. Luckily, there are some excellent videos available online, listed below. Thanks again for reading!
Tutorial: The Making of Viking Chieftain, Part 2
Tutorial: The Making of Viking Chieftain, Part 3

